Build an AI Signature Detection and Analysis System with YOLO, SAM, and OpenCV
- Build an AI Signature Detection and Analysis System with YOLO, SAM, and OpenCV
- Introduction
- Step 1: Prepare the Document
- Step 2: Detect Signature Candidates with YOLO
- Step 3: Put a Human in the Loop
- Step 4: Why a Bounding Box Isn’t Enough
- Step 5: Segment the Signature with SAM
- Step 6: Clean the Extracted Signature
- Step 7: Turn Pixels into Measurements
- Step 8: Combine Features into Indicators
- Step 9: Add Quality Gates
- Step 10: Generate an Audit Trail
- The Complete Architecture
- Try It Yourself
- Conclusion
Introduction
Imagine you work for a bank processing thousands of scanned forms every day.
- Loan applications.
- Account-opening documents.
- Insurance forms.
- Contracts.
Many of them contain something surprisingly difficult for software to understand: a handwritten signature.
A human can glance at a document and immediately spot the signature.
A computer sees something very different.
- Pixels.
- Lines.
- Printed text.
- Form borders.
- Stamps.
- Noise.
And somewhere among all of that, a few irregular pen strokes.
Now suppose we want to answer two questions:
- Where is the signature?
- What visual characteristics does that signature contain?
That turns a seemingly simple task into an interesting computer vision problem.
In this tutorial, we’ll build an AI pipeline that combines YOLO, Meta’s Segment Anything Model (SAM), OpenCV, and human review to find signatures, isolate them from documents, and calculate visual indicators that may help with manual document examination.
But there is an important boundary.
We are not building a forgery detector.
A scanned image alone cannot reliably tell us who signed a document or prove that a pen physically touched the original sheet.
Instead, we’ll build something more realistic: an AI-assisted signature analysis system that produces evidence for human review.
What You’ll Build
The full code (Colab Notebook) is available in the Github Repo – Signature-Extraction-and-Manual-Signing-Indicator-Analysis
By the end of this tutorial, you’ll understand how to:
✔ Detect signatures inside scanned documents using YOLO
✔ Review AI detections before accepting them
✔ Segment signatures precisely using SAM
✔ Remove surrounding document noise with OpenCV
✔ Measure stroke and intensity characteristics
✔ Analyze signature texture and curvature
✔ Convert a signature into a skeleton representation
✔ Detect fragmentation and continuity patterns
✔ Add quality gates to an AI pipeline
✔ Generate structured evidence for human review
Why Signature Analysis Is Harder Than It Looks
Document automation systems are extremely good at reading text.
OCR can extract:
Customer Name: John Smith
Account Number: 123456
Date: 12/08/2026
But signatures aren’t really text.
They are visual marks.
Traditional OCR may ignore them, misread them as characters, or simply treat them as noise.
That matters because signatures appear in workflows across:
- Banking
- Insurance
- Legal services
- Government
- Healthcare
- Mortgage processing
- Procurement
- Compliance
- Enterprise document management
A document pipeline might perfectly extract every typed field while missing the one visual element that tells a reviewer: someone appears to have signed this document.
Modern computer vision gives us a better approach.
Instead of asking one giant AI model to solve everything, we’ll divide the problem into smaller tasks.
The Big Idea: Build an AI Pipeline, Not One AI Model
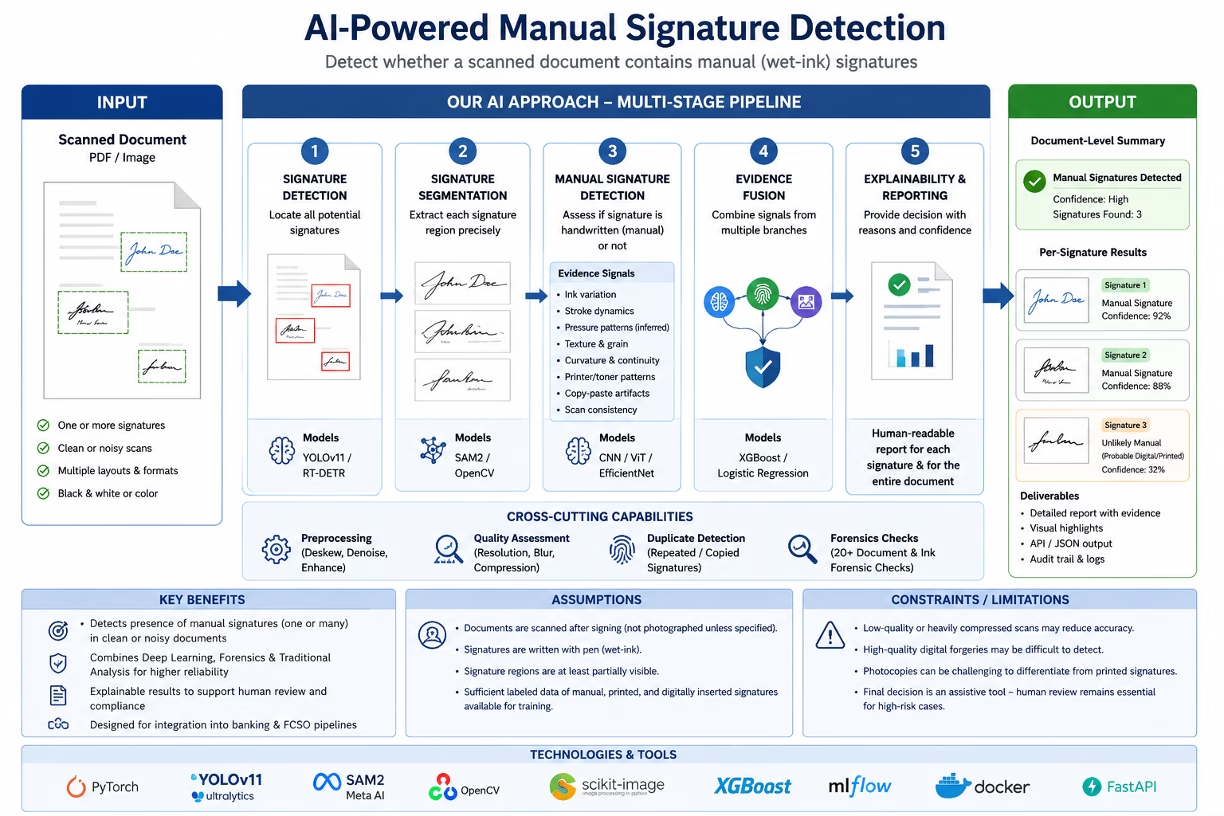
Our system follows this workflow:
Scanned Document
       ↓
Document Quality Checks
       ↓
YOLO Signature Detection
       ↓
Human Review
       ↓
SAM Segmentation
       ↓
OpenCV Cleaning
       ↓
Feature Extraction
       ↓
Quality Gates
       ↓
Signing Indicators
       ↓
Human Review
Notice something important. There isn’t one magical model called:
is_this_signature_real()Instead, different tools solve different problems.
YOLO answers:
Where might the signature be?
SAM answers:
Which pixels belong to that signature?
OpenCV helps answer:
Can we clean and measure those pixels?
Our analysis layer asks:
What observable characteristics does this raster image contain?
And finally:
A human decides what those measurements mean in context.
That architecture is much closer to how production AI systems are actually designed.
Understanding Object Detection
Before writing code, let’s understand the first AI concept.
Suppose you give an AI model this document:
+--------------------------------+
| CUSTOMER APPLICATION           |
|                                |
| Name: Alice Johnson            |
|                                |
| Address: ...                   |
|                                |
| Signature:                     |
|       ~~~AliceJ~~~             |
|                                |
+--------------------------------+
A normal image classifier might say:
"This image contains a signature."But that’s not enough.
We need to know where it is.
Object detection produces something like:
signature
confidence: 0.94

(x1, y1)
    +----------------+
    |   ~AliceJ~     |
    +----------------+
                  (x2, y2)
That rectangle is called a bounding box.
Our project uses YOLO for this job.
Understanding YOLO
YOLO stands for:
You Only Look Once.
The basic idea is wonderfully simple.
Instead of scanning an image thousands of times looking for individual objects, YOLO processes the image and predicts objects and their locations efficiently.
For our project, YOLO isn’t searching for:
car
dog
person
bicycle
It uses a model trained to recognize:
signatureThe detector returns candidate regions along with confidence scores.
Conceptually:
results = detector(document_image)

for detection in results:
    print(detection.bounding_box)
    print(detection.confidence)
A result might look like:
Signature candidate #1
Confidence: 0.91
Bounding box: [840, 1520, 1310, 1730]
That gives us the first major component of our pipeline.
Step 1: Prepare the Document
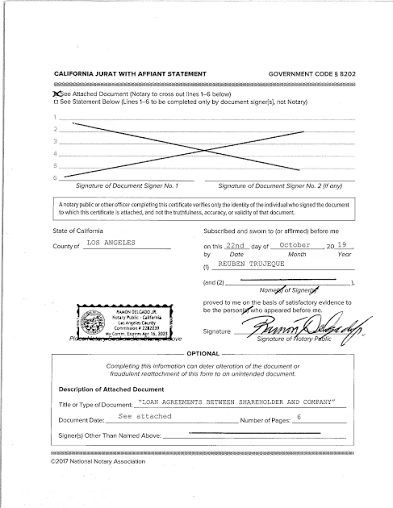
Before asking AI to analyze anything, we need reliable input.
The project accepts common document formats including:
- PNG
- JPEG
- TIFF
- BMP
PDFs require an additional step.
A PDF page isn’t automatically the same thing as an image array that our vision pipeline can process.
So the selected page is rendered into an image.
Conceptually:
PDF
 ↓
Select Page
 ↓
Render Page
 ↓
RGB Image
The project also checks image quality.
This is more important than it sounds.
Imagine trying to analyze this:
High-quality scan:

~~~~JohnSmith~~~~
versus:
Heavy compression:

~~J..nS...h~~
AI cannot recover information that never made it into the image.
Understanding Image Quality
Several things can damage signature evidence:
Low resolution
Thin strokes disappear.
JPEG compression
Artificial block patterns appear.
Blur
Fine stroke edges vanish.
Scanner enhancement
Automatic contrast processing can change ink intensity.
Photocopying
Texture information can disappear.
This means image quality isn’t just a preprocessing detail.
It affects what conclusions we’re allowed to draw later.
That idea will become important when we build quality gates.
Step 2: Detect Signature Candidates with YOLO
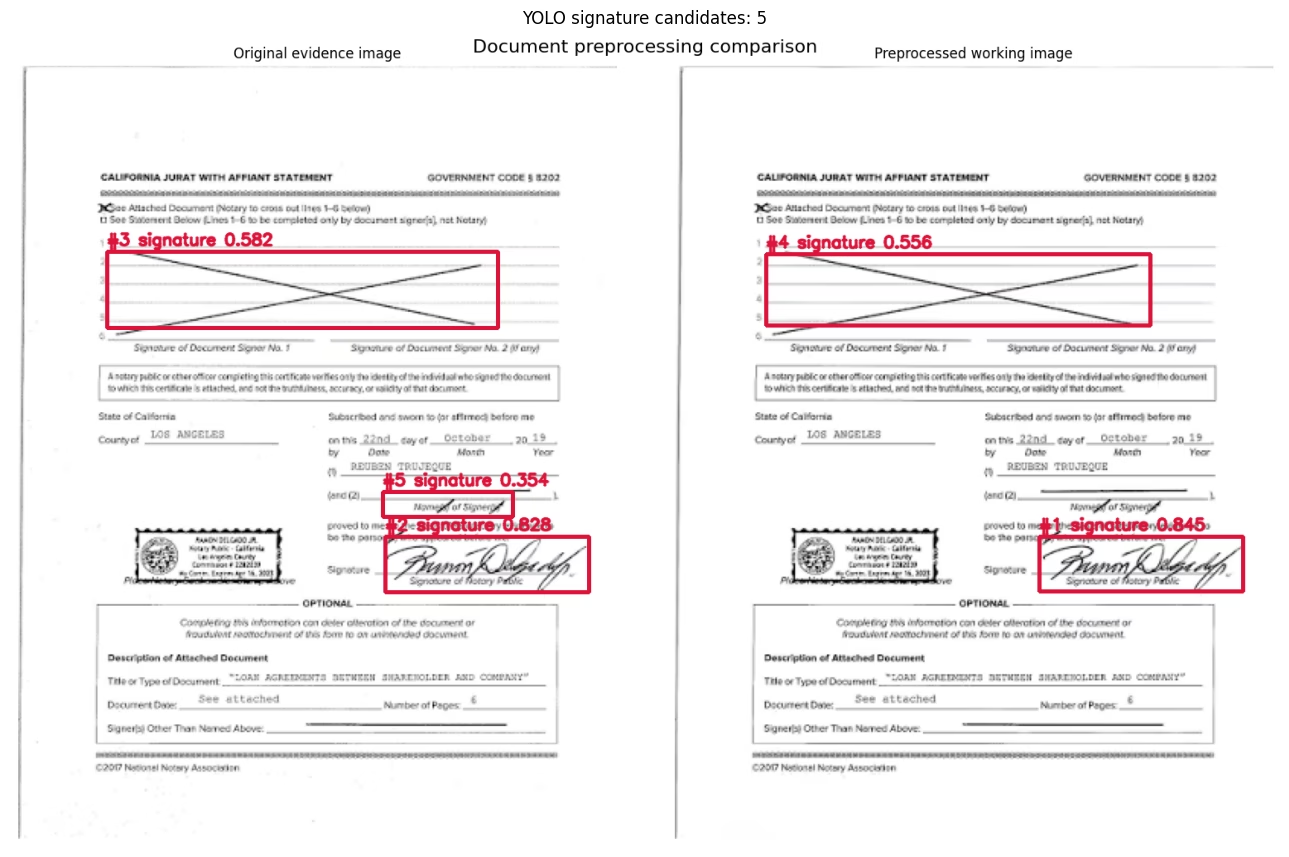
Now we send the document image through the signature detector.
The model identifies regions that visually resemble signatures.
Imagine it returns three candidates:
Document
│
├── Candidate 1 → confidence 0.94
├── Candidate 2 → confidence 0.72
└── Candidate 3 → confidence 0.61
The obvious temptation is:
Take the highest confidence detection.But that can be dangerous.
A model might confuse:
- handwriting
- initials
- stamps
- scribbles
- logos
- handwritten dates
with signatures.
So this project adds something many beginner AI tutorials leave out.
A human checkpoint.
Step 3: Put a Human in the Loop
The system displays the YOLO candidates.
A reviewer decides which ones actually contain the signature being investigated.
YOLO
 ↓
Candidate 1 ──→ Accept
Candidate 2 ──→ Reject
Candidate 3 ──→ Reject
 ↓
Continue
Why not automate everything?
Because confidence does not mean correctness.
A confidence score of 0.94 does not mean:
There is a 94% probability this is the correct legal signature.
It is a model score describing how strongly the detected image pattern matches what the detector learned.
Those are very different ideas.
For high-stakes workflows, adding human review at uncertain boundaries is often better engineering than pretending the AI is infallible.
Step 4: Why a Bounding Box Isn’t Enough
YOLO gives us something like this:
+---------------------------+
|                           |
|   Signature: ~JohnSmith~  |
|                           |
+---------------------------+
The bounding box contains the signature.
But it may also contain:
- printed lines
- text
- form borders
- nearby characters
- stamps
- background noise
For later measurements, we want something closer to:
~JohnSmith~That is where segmentation enters the pipeline.
Understanding Image Segmentation
Object detection asks:
Where is the object?
Segmentation asks:
Which exact pixels belong to the object?
Think about cutting someone’s photograph out of a magazine.
Object detection draws a rectangle around the person.
Segmentation follows their actual outline.
The difference looks roughly like this:
OBJECT DETECTION

+----------------+
|     object     |
|    /------\    |
|   /        \   |
+----------------+


SEGMENTATION

      ####
    ########
   ##########
     ######
The second representation is called a mask.
Every pixel is essentially classified as:
signatureor:
not signatureStep 5: Segment the Signature with SAM
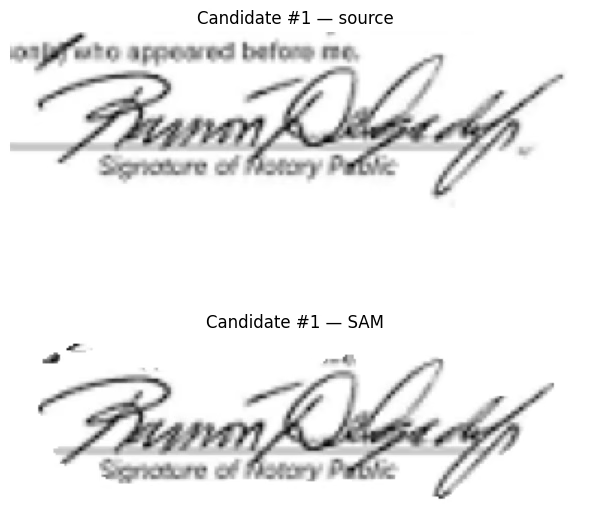
For segmentation, the project uses the Segment Anything Model, or SAM.
SAM is a general-purpose segmentation model.
Instead of retraining SAM specifically for signatures, we give it a prompt.
Our prompt is the YOLO bounding box.
Document
   ↓
YOLO
   ↓
Bounding Box
   ↓
SAM
   ↓
Segmentation Mask
This is a powerful AI design pattern.
One model produces information that becomes the input prompt for another model.
YOLO says:
Look around here.
SAM says:
These pixels appear to form the object inside that region.
The result is a cleaner signature mask.
Step 6: Clean the Extracted Signature
Segmentation still isn’t perfect.
Small artifacts can remain.
So the project uses OpenCV for conservative cleanup.
Why conservative?
Because aggressive cleaning can destroy the very evidence we’re trying to measure.
Imagine a thin pen stroke:
Original

----------


Aggressive cleanup

---   ----
We just created an artificial break.
Later, a continuity measurement might interpret that as evidence about the signature.
But the pipeline itself caused it.
That’s a serious problem.
So good forensic-style image processing should follow a simple principle:
Preserve information whenever possible.
The project even includes checks designed to roll back cleaning operations that appear too destructive.
Step 7: Turn Pixels into Measurements
Now we reach the most interesting part.
We have isolated the signature.
Instead of immediately asking:
Manual or digital?we measure observable characteristics.
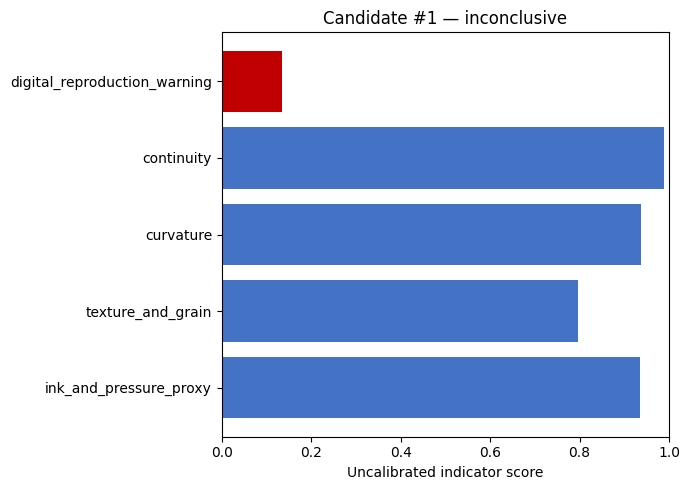
The project examines several families of features:
Signature
   ↓
├── Ink intensity
├── Stroke width
├── Texture
├── Curvature
├── Skeleton structure
└── Fragmentation
Let’s understand each one.
Understanding Ink Intensity
A grayscale image represents brightness numerically.
Roughly:
0   = black
255 = white
A signature might contain pixels such as:
42
51
68
47
73
Instead of only calculating average darkness, we can ask:
How much does darkness vary across the signature?
This gives us an image-based intensity variation measurement.
But we need to be careful with interpretation.
A scan does not directly record pen pressure.
It records the result of:
ink
+
paper
+
lighting
+
scanner
+
compression
+
image processing
So intensity variation is a proxy, not a physical pressure measurement.
Understanding Stroke Width
Real handwriting contains changing stroke shapes.
Our system estimates how wide the signature strokes appear at different locations.
Imagine:
thin → thick → thin → thickWe can summarize this variation statistically.
The pipeline also considers relationships between stroke width and darkness.
Again, these are raster-image measurements.
They do not directly tell us how hard someone pressed a pen.
Understanding Texture
Zoom deeply into a scanned signature.
The ink region isn’t necessarily perfectly uniform.
You may see tiny variations created by:
- paper
- ink
- scanning
- printing
- compression
- image resizing
The project therefore calculates texture-related indicators, including intensity entropy and high-frequency image characteristics.
You can think of entropy as a rough question:
How visually predictable are the pixels?
A perfectly uniform region contains little variation.
A complex region contains more.
But scanner noise can also create complexity.
So texture alone cannot prove anything.
Understanding Curvature
Signatures contain turns.
Loops.
Hooks.
Sweeps.
Sharp corners.
Smooth curves.
The project examines contours and turning angles to estimate geometric complexity.
Imagine tracing a signature with your finger.
At every small step, ask:
How much did my direction change?Those changes give us curvature-related measurements.
Understanding Skeletonization
Here’s one of the coolest computer vision tricks in the project.
Imagine a thick signature stroke:
██████████
██████████
██████████
Skeletonization reduces it toward its centerline:
----------For an entire signature, the result looks like a wire-frame representation of the handwriting.
Why do this?
Because it makes structural properties easier to analyze.
We can count things such as:
- endpoints
- junctions
- branches
An endpoint is where a skeleton line terminates.
A junction is where multiple paths meet.
These measurements give us another description of signature structure.
Understanding Connected Components
Suppose our extracted signature contains:
John SmithThe image may contain several disconnected pixel regions.
Computer vision calls these connected components.
Too many tiny components can indicate fragmentation.
But fragmentation can have many causes:
actual handwriting
scanner noise
poor segmentation
compression
cleanup
low resolution
This is why individual features should never be interpreted in isolation.
Step 8: Combine Features into Indicators
At this point we have measurements rather than conclusions.
Conceptually:
Ink variation
      +
Stroke variation
      +
Texture
      +
Curvature
      +
Skeleton structure
      +
Fragmentation
      ↓
Indicator Logic
The project limits its final assessment to categories such as:
manual_signing_indicators_presentpossible_reproduction_indicatorsor:
inconclusiveThat wording matters.
The system is intentionally not saying:
GENUINE SIGNATUREor:
FORGED SIGNATUREbecause the available evidence doesn’t justify those claims.
Step 9: Add Quality Gates
Here’s an engineering lesson that extends far beyond signatures.
Sometimes the correct AI answer is:
I don’t know.
Suppose SAM only captured half of the signature.
Then every downstream measurement is suspicious.
Bad segmentation
       ↓
Bad feature measurements
       ↓
Bad interpretation
Instead of blindly producing a score, the pipeline can stop downstream interpretation and return:
INCONCLUSIVEThis is called a quality gate.
Think of it like airport security.
You don’t proceed to the next stage until the current checkpoint passes.
Input Quality
     ↓ PASS
Detection
     ↓ PASS
Human Review
     ↓ PASS
Segmentation
     ↓ PASS
Cleaning
     ↓ PASS
Feature Analysis
Production AI systems need these guardrails.
Step 10: Generate an Audit Trail
The final output isn’t just one number.
The workflow preserves intermediate artifacts and reports.
That can include:
Original document
      ↓
Detection image
      ↓
Candidate crops
      ↓
Segmentation masks
      ↓
Cleaned signature
      ↓
Feature measurements
      ↓
Assessment
      ↓
Report
The project also creates checksums for artifacts.
A checksum acts somewhat like a digital fingerprint for a file.
If the file changes, its checksum changes.
That makes the processing workflow easier to audit and reproduce.
For enterprise AI, this is an important lesson:
Don’t only save predictions. Save enough evidence to understand how the prediction was produced.
The Complete Architecture
Our final system looks like this:
              DOCUMENT
                  │
                  ▼
        ┌─────────────────┐
        │ Decode Document │
        └────────┬────────┘
                 │
                 ▼
        ┌─────────────────┐
        │ Quality Checks  │
        └────────┬────────┘
                 │
                 ▼
        ┌─────────────────┐
        │ YOLO Detection  │
        └────────┬────────┘
                 │
                 ▼
        ┌─────────────────┐
        │ Human Selection │
        └────────┬────────┘
                 │
                 ▼
        ┌─────────────────┐
        │ SAM Segmentation│
        └────────┬────────┘
                 │
                 ▼
        ┌─────────────────┐
        │ OpenCV Cleaning │
        └────────┬────────┘
                 │
                 ▼
        ┌─────────────────┐
        │ Feature Analysis│
        └────────┬────────┘
                 │
                 ▼
        ┌─────────────────┐
        │ Quality Gates   │
        └────────┬────────┘
                 │
                 ▼
        ┌─────────────────┐
        │ Indicator Report│
        └────────┬────────┘
                 │
                 ▼
             HUMAN REVIEW
This architecture teaches something bigger than signature analysis.
Reliable AI systems are often pipelines of specialized components rather than one giant model.
Why Not Train a Forgery Classifier?
You might be wondering:
Why not simply train a neural network with:
genuine
forged
labels?
Because that’s a different problem.
Datasets such as handwritten signature-verification datasets are typically designed around questions like:
Does this questioned signature belong to the same writer as these reference signatures?
Our project asks something different.
We are examining a static document image for visual characteristics potentially associated with manual signing or reproduction.
A proper machine-learning classifier for that problem would need representative labeled examples of categories such as:
wet-ink original
printed signature
photocopied signature
scanned reproduction
digitally pasted signature
stamp
Ideally, those samples would also cover many:
- scanners
- printers
- resolutions
- compression settings
- pens
- papers
- document types
Without such a dataset, pretending that an engineering score is a calibrated probability would be misleading.
Try It Yourself
Once you understand the basic pipeline, experimenting is the best way to learn.
Beginner Challenge
Run several documents through the detector.
Compare:
YOLO confidence
vs.
whether you think the detection is actually correct
You’ll quickly discover why confidence and correctness aren’t identical.
Intermediate Challenge
Take one signature and create several versions:
Original
↓
JPEG compressed
↓
Blurred
↓
Lower resolution
↓
Higher contrast
Run the feature extractor on each.
Compare how the measurements change.
This experiment teaches an extremely important lesson:
Image preprocessing can change your evidence.
Advanced Challenge
Build a labeled dataset containing multiple acquisition classes:
Wet-ink scan
Printed signature
Photocopy
Digital paste
Re-scan
Then train a classifier using either:
- the engineered features from this project, or
- learned image embeddings.
Evaluate it on documents produced using scanners and printers that were not present in training.
That last requirement is critical.
Otherwise, your model may learn the scanner instead of the signature.
Conclusion
What This System Can Do
The pipeline can:
- Locate signature-like regions
- Extract signatures from surrounding document content
- Measure raster-image characteristics
- Flag image-quality problems
- Produce repeatable measurements
- Preserve intermediate artifacts
- Assist human review
These are useful capabilities.
But they have clear limits.
What This System Cannot Do
It cannot independently determine:
- Who signed the document
- Whether a signature is genuine
- Whether a signature was forged
- Whether fraud occurred
- Whether a document is legally valid
- Whether a pen physically touched the examined sheet
Those questions require additional evidence.
In serious forensic work, investigators may examine original documents using techniques that simply aren’t available from an ordinary scanned image.
That’s an important lesson for every AI developer:
Your model’s conclusions should never exceed the information contained in its input.
Real-World Applications
This architecture could support many document-processing workflows.
Banking
Automatically locate signatures in account-opening, loan, and authorization documents before sending suspicious or low-quality cases to reviewers.
Insurance
Check whether claim forms contain expected signature regions and extract them for manual inspection.
Legal Document Processing
Locate signatures across large collections of agreements and contracts.
Government
Assist with digitization and review of signed forms.
Enterprise Compliance
Add signature-presence and image-quality checks to document intake workflows.
Document Management
Extract signatures as structured visual elements rather than allowing OCR pipelines to discard them.
The important word is assist.
For consequential decisions, the AI should support qualified reviewers rather than replace them.
Five Lessons Hidden Inside This Project
The most valuable lessons here aren’t specific to signatures.
1. Detection and segmentation solve different problems
YOLO finds the object.
SAM isolates its pixels.
Combining them creates a stronger pipeline.
2. Human-in-the-loop AI is often good engineering
Automation doesn’t have to mean removing every human decision.
Sometimes AI should narrow the search space while humans make the consequential judgment.
3. Image measurements aren’t physical measurements
Pixel darkness isn’t pen pressure.
A raster image isn’t the original sheet of paper.
Always distinguish proxies from direct evidence.
4. Quality gates are part of the AI system
A sophisticated model operating on bad input can still produce nonsense.
Good systems know when not to make a prediction.
5. Uncertainty should be visible
inconclusive isn’t a failure.
In high-stakes AI, it can be the most responsible output available.
Key Takeaways
We started with a deceptively simple problem:
Find a signature inside a document.
That led us through several fundamental AI concepts.
We learned that object detection locates signatures.
We learned that segmentation isolates their pixels.
We saw how OpenCV can clean and measure the resulting image.
We used skeletonization, connected components, texture, intensity, and curvature to turn pixels into measurable characteristics.
And most importantly, we learned that measurements are not automatically facts about the physical world.
The resulting architecture is:
AI Detection
     +
AI Segmentation
     +
Computer Vision
     +
Quality Control
     +
Human Judgment
That’s a much more realistic picture of production AI than a single model.predict() call.
Next Project: Build a Document Verification Pipeline
Finding a signature is only one piece of document intelligence.
Imagine extending this project so that the system could also detect:
- Stamps
- Seals
- Dates
- Checkboxes
- Initials
- Altered regions
- Duplicate images
- Missing signatures
Then combine those signals into a complete document-review assistant.
That’s where we’ll go next.
Discover more from Debabrata Pruseth
Subscribe to get the latest posts sent to your email.